This app was released in this year’s Shmoocon’13 by Intrepidus Group. You can get the app from the Google play store. This app as the name suggests is an android security learner app, there are deliberate vulnerabilities in this app from bad logging to intent manipulation. There will series of blog posts which gives a walk through of each lesson.
Preparing for App assessment:
- Get an Android Device or Emulator. You should have downloaded Android SDK (ADT Bundle)
- Make sure adb (found in ADT bundle) can recognize your device, using the following command.
c:\> adb devices
If your device isn’t listed, make sure that either USB debugging mode is enabled on your phone or the right drivers are installed for your phone.
- You can get list of package’s and their location installed from the following command, we are interested in the Learner app, so we can pipe that to your search command:
c:\> adb shell pm list packages | find "Learner"
- Use the following command to pull the apk file out of the device.
c:\> pull /data/app/com.intrepidusgroup.learner-1.apk
- Use Dex2jar tool to unpack the .apk file. You can drag-and-drop the .jar file into JD-Gui to de-compile all the class files. Note: You can’t edit the de-compiled class files, its only useful to read the code easily.
d2j-dex2jar <path-to-.apk> -o <path-to.jar>
- Use apktool to disassemble the APK package and its .dex files and generate the smali files.
apktool d <path-to-.apk>
Using this tool to disassemble files allows you to change the code, and reassemble it back to a functioning .apk file. To do this, use apktool again, but you need to be on the root directory of the disassembled file. The apktool should be able to find apktool.yml to reassemble back.
apktool b
7. This will create two directories, build and dist. dist will contain the apk file and build is the unpacked contents of the apk archive. Now, when you install the newly generated apk file in the device, it fails because the package is unsigned. Detailed instructions for signing a package is given here Android Package Signing, You can skip the second step.
Challenges:
Lesson 1(Android Logging Secrets):
Reference: Android Log
As the name suggests this deals with Android’s logging facilities. The reference page has all the necessary instructions that are required to pass this challenge. You can either use adb (command line) or DDMS (GUI) to get the log messages out of the device. Since a lot of stuff is being thrown into logs, it will be helpful to filter the records to find the log entries pertaining to the Learner app. If you want to create a proper filter on the command line, in adb you would use the following syntax:
c:\> adb logcat filter-1 filter-2 … filter-n
filter -> <tag>:<priority>
where ‘tag’ is used to represent the application component that is generating the logs and ‘priority’ sets the priority level for logs. We shall look through the de-compiled code to figure out what the tag and priority are:

As you can see from the above picture the tag is “LEARNER” and the priority is set to “D” which is Debug. Hence, the filter will look like this:
c:\> adb logcat LEARNER:D *:S
*:S will filter out every tag thus limiting the output to filter-1.

That’s it! Input the above key and submit the challenge. You can now play with other filters like the ones with priority set to “E” for Errors, etc. and filter out log messages as efficiently as possible.
Lesson2Activity (Screwy File Permissions):
When you look into the drop-down menu of Lesson2Activity, you will be presented with an overview of methods and data-members present in this class. Most of the method names are self-explanatory. An important method to learn at this point is the “onCreate()” method which is called when the user selects the Lesson2Activity from the app. Note: All the activities are called in this fashion.

When we look in this method, we find a call to “createFile()”, which seems interesting in the context of this challenge. The first line of this method shows that the data member “filename” is being set by a call to “getFileName()”. By following this method, we find the format in which the filename is created.
“getDate()” returns the current date to “getFilename()” in the format specified by the SimpleDateFormat object. Similarly, “getPhoneNumber()” as expected will return the phone number associated with the phone. The getFileName() method then appends the output from the above two methods and appends “.txt” to it. (Note: if your Android device, such as a tablet, is not associated with a number, getPhoneNumber() will return 1234567890).
You can check the existence of that file by opening a shell and doing an ls -l on the file that’s been created in the default directory, /data/data/
Answer: 201301281234567890.txt
Lesson3Activity (URI handlers Craziness):
Solving this lesson is similar to the previous one, except that you need to understand how basic requests are handled. When you try and play with the app, you will notice that a hyperlink is generated in the white WebView window when you click on “Request URI”. Now, when you click on the hyperlink you will see “LOCKED” appear. When you look through the decompiled class of this activity, it will not be apparent where this “LOCKED” message is generated. In fact, it’s not clear at all what is happening when we click on the generated link.

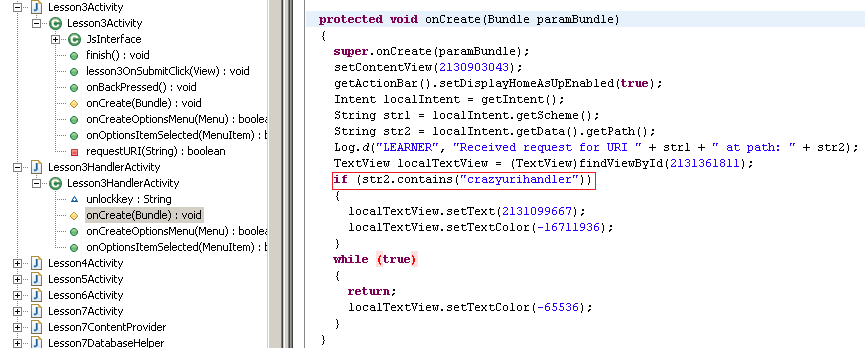
To understand what is happening here, it’s useful to think about how web servers work. You give them a request, the server processes the request and sends back a response. The handler for a web request is a web server. In order for this activity to complete, there must be a handler for the request this activity generates. Lesson3HandlerActivity is where all the magic happens. Check the “onCreate()” method where the requested URI is processed through an intent that arrives to the getIntent() method. The important thing here is the condition for the “if” statement that parses the Intent’s data. In particular, onCreate() checks for the presence of the substring “crazyurihandler” in the request path, and then does something to the GUI interface if it exists. It is reasonable to try to put the “crazyurihandler” in the URI window of the lesson. Watch what happens! If you have done it correctly, then you will see the “UNLOCKED” message appear.