Please check the first part of this series on Android 101, if you want to check the necessary tools and how to prepare for the app assessment.
Lesson4Activity (SSL man in the middle):
The instructions for this lesson suggest that we need to intercept the token that is sent as a request to a server. However, the request is sent via https, so the traffic when we intercept will be encrypted. We need to find a way to decrypt the traffic, so that we can get the secret token. We can do this using a local proxy that supports SSL connections. The proxy will generate a new certificate for the host we are connecting to. Once we accept this certificate, both the connection between server < - > proxy and the connection between proxy < - > user would be encrypted. The proxy could then decrypt the traffic using the public certificate that was issued to the user and re-encrypt the data with the certificate of the server. In this way, the proxy can see all the data in plain text. The first step is to set up Burp Proxy (for the purposes of this exercise, any HTTP proxy will do) and use it to proxy the data from the Android device. Once Burp is loaded, go to the proxy tab and then options. In the proxy listeners, set burp to listen on all interfaces on a particular port.

Once you have done this, go to your Android device and set it up to connect to this proxy. Make sure that your Android device and the system running Burp Proxy are on the same network.

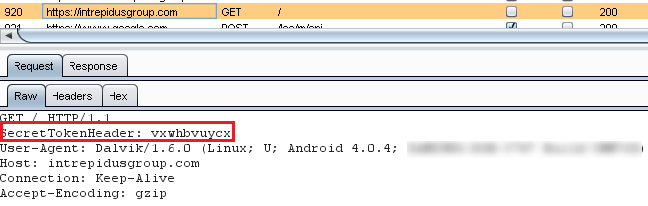
When the intercept is on in Burp, you should see requests being intercepted like this:
(Image taken down, it used to be at; https://intrepidusgroup.com/tools/armor/IGLearnerWalkthrough/images/image10.png)
Now, try to visit a site using https. You will get a security error on your mobile browser like this. (Image taken down, it used to be at; https://intrepidusgroup.com/tools/armor/IGLearnerWalkthrough/images/image23.png) Burp is sending you a certificate that is not trusted by your mobile browser. This means that even the Learner app does not trust the certificate and the connection fails. In order to avoid this issue, we need to import the Root CA of Burp proxy into the device’s certificate store. To do that, go to your browser on your computer, and allow the browser to run through the proxy as well.

These settings are for Chrome/IE. Other browsers may not be affected by changes in this interface, so you will need to configure them independently. Once the browser is configured to run through the proxy, you will see the certificate error in your computer browser as well.

You can get additional information about the certificate through your browser. In Chrome, click on the lock symbol next to the url and Chrome will display the security information for this site, including the certificate itself. This certificate is for this host, but we need to get the Root CA of Burp which signs this per host certificate.
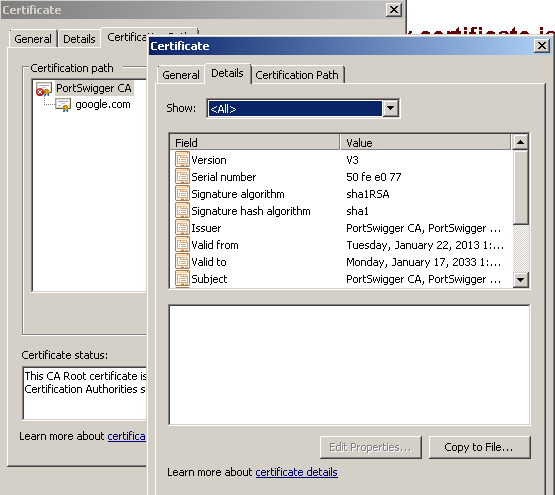
Click on the tab “Certification Path”, then you will see PortSwigger CA as the root for google.com. Double-click on that one and a new window will open with certificate information for the root CA. You need to export this certificate and import it into your mobile device’s trusted certification store. To do that, click on “copy to file…” and follow the wizard. Then copy the saved .cer file into the root folder of your mobile external storage. Once you have done that, go to Settings » Security » Install from device storage. This will load the PortSwigger CA into the trusted certificate store of the device.
Now, your connection should happen seamlessly. The proxy can view the data in plain text. Remember that if you get a security error on your mobile browser after doing the above steps then you probably missed something, try once again.
The certificate on your mobile browser will resemble the screenshot below. Notice that the certificate was issued by PortSwigger, but the browser says it is valid.
 Now, run the app and check your proxy for the secret token.
Lesson5Activity (Advanced MITM):
References: 1. Understanding Smali
Tools: 1. Moxie’s Pin tool (here)
Reading: Authenticity-is-broken-in-ssl-but-your-app-ha
The goal of this lesson is very similar to the previous lesson except that the certificate is pinned to the hostname. This means the app is hardcoded with the fingerprint of the certificate issued by the valid server, and the app checks the received certificate against this fingerprint instead of checking with the certificate store. So, the certificate issued by Burp will not match the fingerprint and will cause a certificate error in the app. In order to bypass this error, we need to know where the check is performed and what the attacker has influence on. If we can find where in the app the pin is hardcoded, we can replace it with a pin generated from the Burp certificate and re-package the app. The certificate issued by Burp can be easily retrieved like we did in the above lesson, except that we need to export the host certificate, instead of the PortSwigger CA, to generate the pin. You can use the pin.py tool mentioned in the Moxie’s blog to generate a pin for new certificates. (Note: the certificate that you import must be Base64 encoded. This option is available on the import wizard) The HttpRequestTaskWithPinning class has the pin hardcoded inside. However, jd-gui couldn’t decompile the class files for this file, so we need to use apktool to generate smali files:

Re-packaging instructions are provided in “Preparing for App assessment” section of this tutorial. Once you finish re-packaging and signing the app, you need to re-install it on your device and try Lesson 5 again:
